VizVid Documentation
VizVid is a versatile multimedia player frontend designed specifically for VRChat. Whether you are watching videos with friends, hosting music performances, or setting up a gallery exhibition, VizVid provides a powerful solution for any scenario.
Built with a modular design, VizVid allows you to pick and choose the exact components you need to build a custom player tailored to your world.
Note
This documentation covers version v1.8.0 and later. Some features or instructions may differ in older versions.
Quick Start
How to Add VizVid into Your World
- Right-click on the hierarchy.
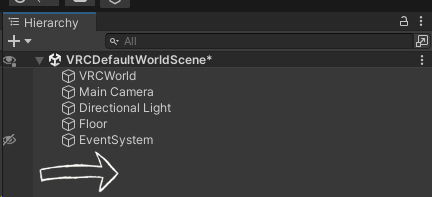
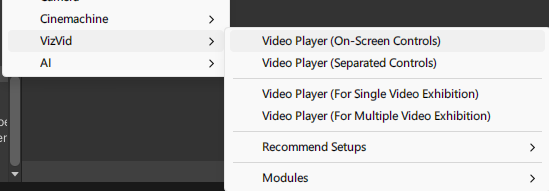
- Find VizVid in the menu.
- Choose the player preset you want to add.
Common Presets
General-purpose presets for most uses.
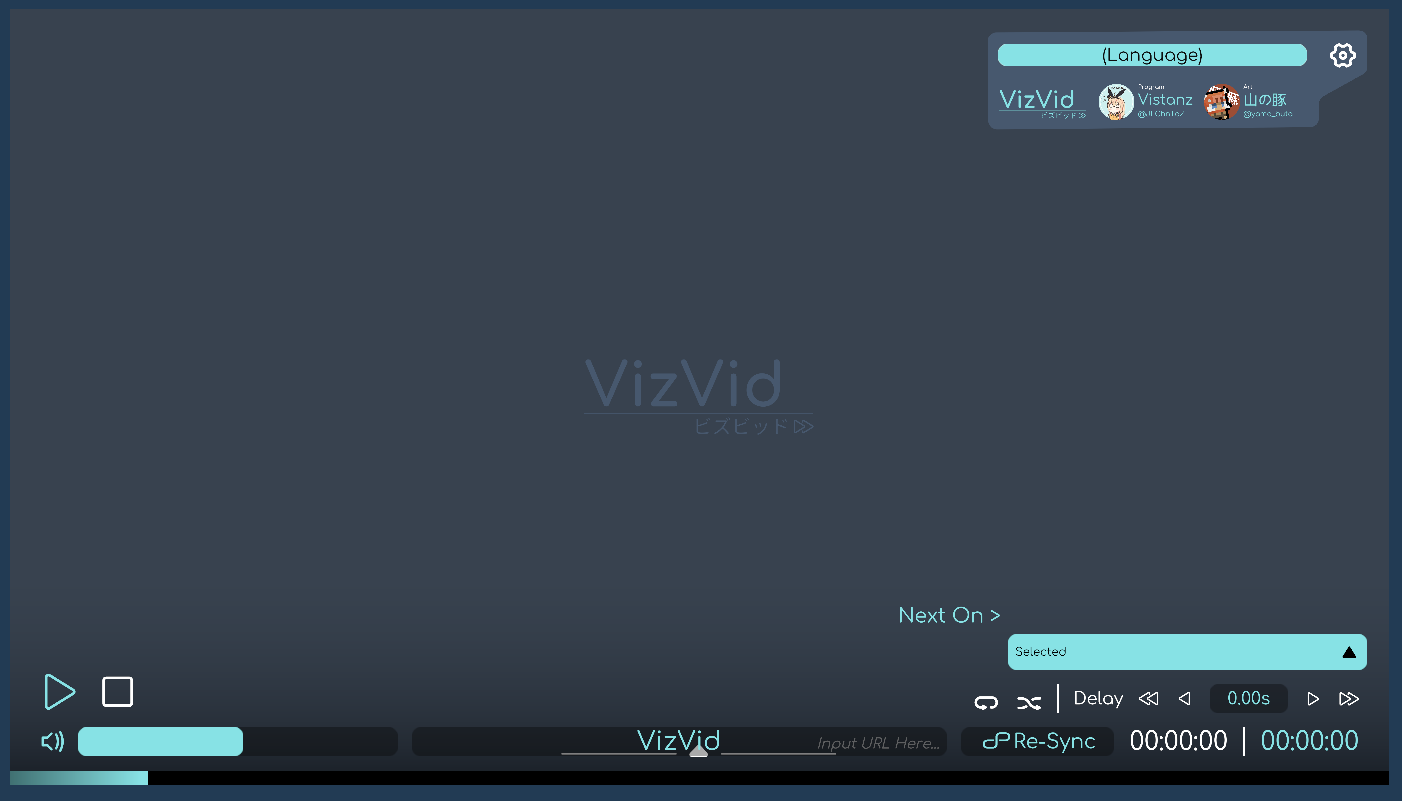
- On-Screen Controls
The simplest version — controllers embedded on the screen. No extra spaces needed.
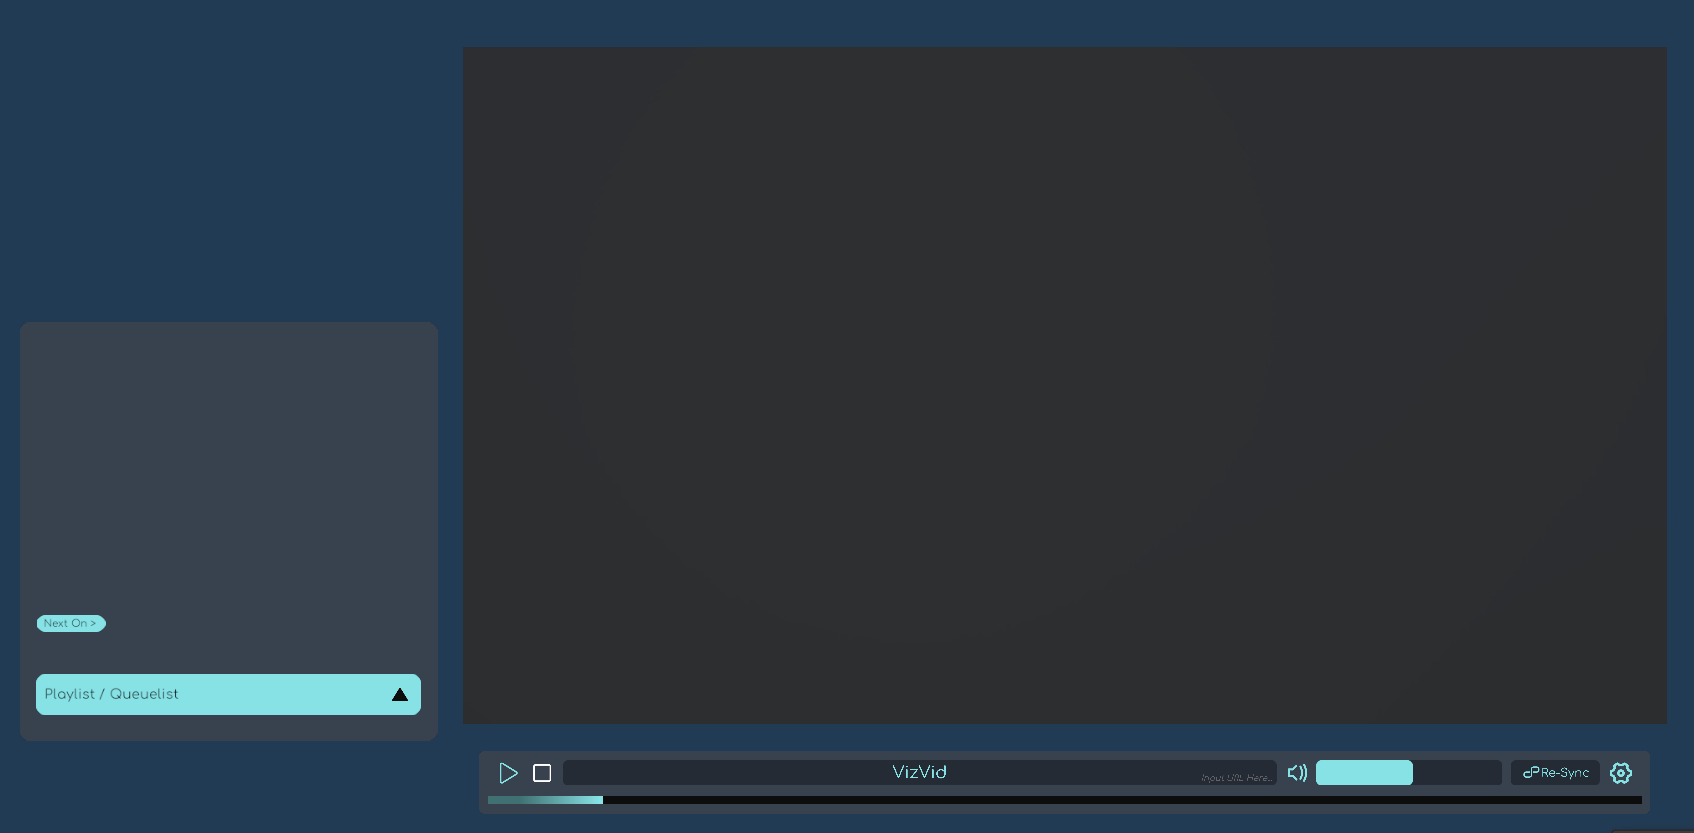
- Separated Controls
Controller and playlist panels can be placed independently if you didn't prefer touchscreen-like controlls.
Exhibition Presets
Designed for exhibition use. VizVid runs in local mode. Includes a proximity-based autoplay feature.
- For Single Video Exhibition
Designed to play a single video with playlist module disabled. - For Multiple Video Exhibition
Designed to play multiple videos and supports playlists.
Recommended Settings
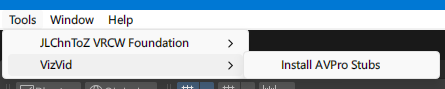
Enable Playback Speed Control
This feature depends on AVPro Stub.
Follow the steps on the image below to install it.
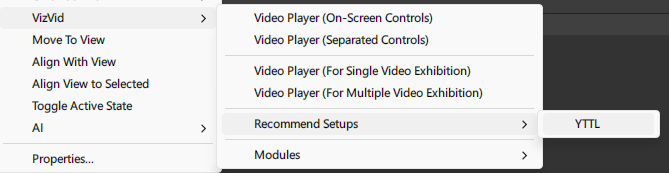
Enable YTTL
Support showing video titles for YouTube videos.
Follow the steps on the image below to install it.
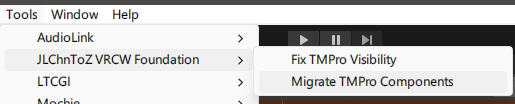
Migrate to Text Mesh Pro
Using Text Mesh Pro will make fonts on VizVid even clearer.
Select all VizVid prefabs in hierarchy.
And follow the steps on the image below to migrate.
Settings
Global Settings
Settings applied to all VizVid instances in this world.
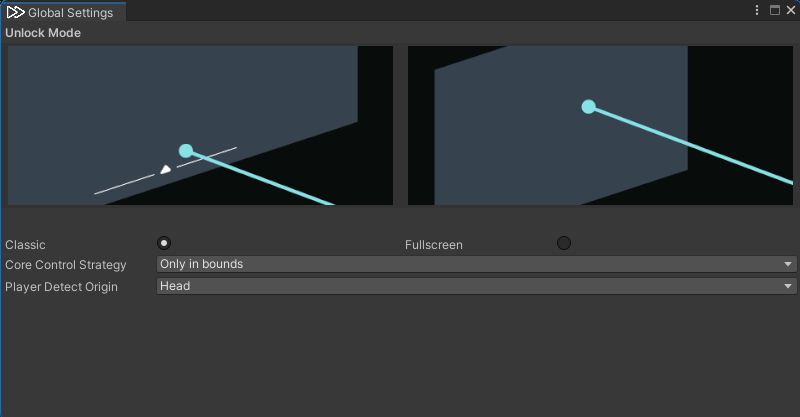
- Unlock Mode
Adjusts the default unlock mode for the VizVid touchscreen.- Classic
Aim the pointer at the bottom of the screen, and press after the indicator appears to display the interface. - Fullscreen
Point anywhere on the screen and press to display the interface.
- Classic
- Core Control Strategy
Feature exclusive to Active Region. Adjusts the function trigger strategy. Default value isWithin Bounds Only.- All Controlled
Only enables the following Active Region features:- AudioLink
- Overlay Control
- Only in bounds
All features are enabled only upon entering an Active Region. - Only in bounds, nearset if none
Enables all features when inside an Active Region. If the player is outside, it automatically selects and enables the nearest region.
- All Controlled
- Player Detect Origin
Sets the detection origin position on users for the Active Region.
VizVid Settings
Switch from Simple Mode to Advanced Mode to display the full configuration options.
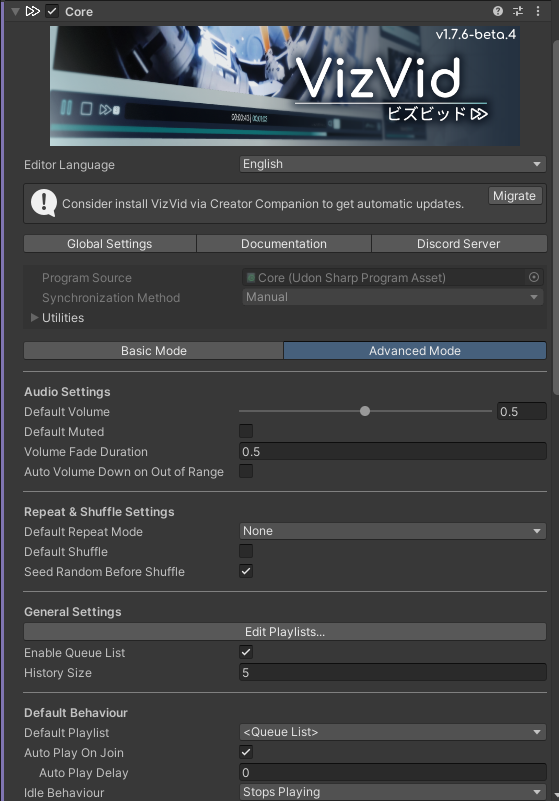
For detailed information, please refer Core section.
Editing Playlists
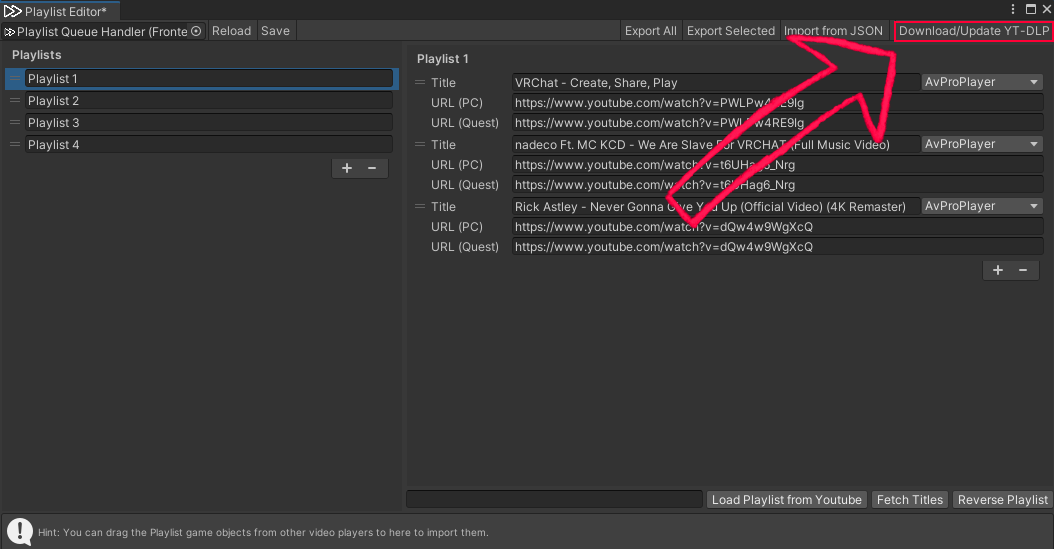
Here's the detailed guide for playlist editor.
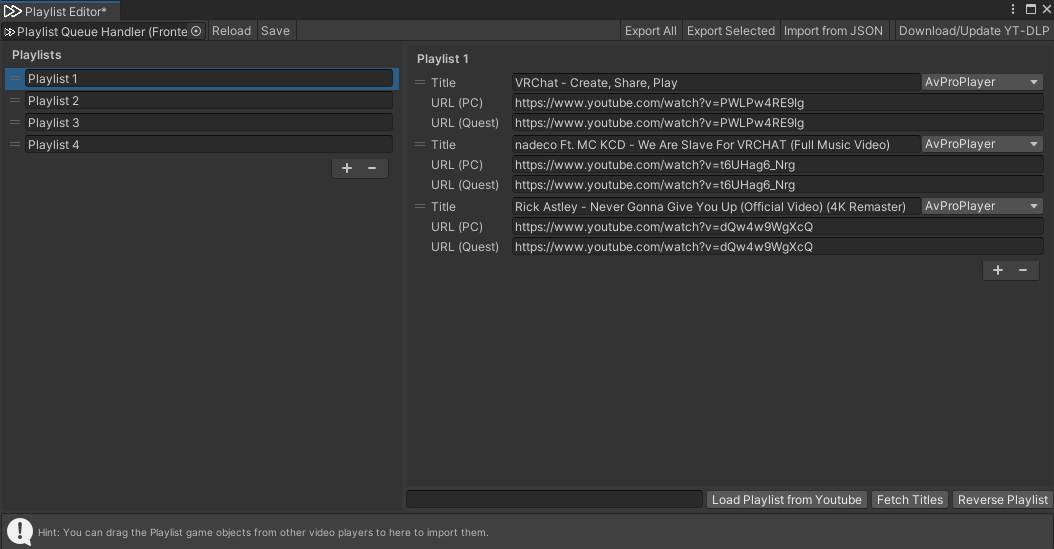
- Left-side playlist column
- Click + or ー to add / remove playlists.
- You can store multiple playlists. Drag on the left = icon to reorder playlists.
- Right-side playlist contents
- Click + or ー to add / remove contents.
- Titles can be set manually, or after entering a YouTube URL, use the Fetch Titles below to auto-fill the title.
- Enter a PC URL, the Quest URL will be auto-filled.
URL (PC) and URL (Quest) let you set different URLs for different platforms (useful for live streams). - Choose a different backend depending on media type;
AVProPlayeris set by default. - Drag on the left = icon to reorder contents.
- Top toolbar
- Reload: Restore the last saved playlist.
- Save: Save the current playlist to the player.
- Export All: Export all playlists to a JSON file.
- Export Selected: Export the currently selected playlist to a JSON file.
- Load from JSON: Import an external JSON playlist.
- Download/Update YT-DLP: Install or update yt-dlp (for fetching video titles).
- Bottom toolbar
- Load Playlist from YouTube: Paste a YouTube playlist URL into the left column to import it into the current playlist. Supports Public and Unlisted playlists (accessible via link); Private playlists are not supported.
- Fetch Titles: Read a YouTube link and automatically fill in the title.
- Reverse Playlist: Reverse the order of the playlist.
Modules
Beyond the standard templates, VizVid provides various modules that can be mixed and matched.
Key Concepts
Before proceeding, distinguish between these two terms first:
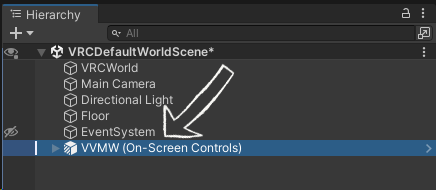
- Prefab
The objects visible in your Hierarchy. These are pre-configured containers of components.
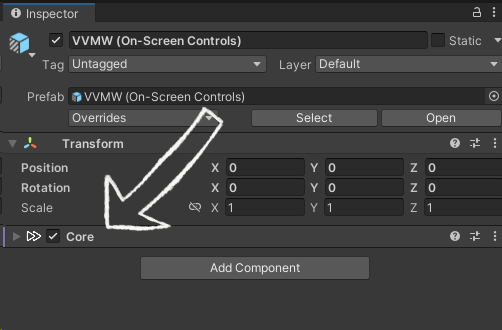
- Component
The scripts visible in the Inspector. These are the functional building blocks of VizVid.
Prefabs
Right-click in the Hierarchy and navigate to VizVid > Modules to find these prefabs:
- VizVid Core
The "Brain" of VizVid.
Every independent player instance requires one Core.
By default, it includes the prefabs in the follow:- AVPro Module
- Builtin Modile
- Image Module
- Playlist Queue Handler
- Locale
- Rate Limit Resolver
- Dafault Audio Source
- On-Screen Controls with Screen
A touchscreen-style controller bundled with a screen object. - Separated Controls
A standalone controller that can be placed anywhere without video screen. - Separated Controls (Narrow)
A compact version for tight spaces. - Separated Controls (with Alt. URL Input, Narrow)
Compact controller with support for entering alternative URLs on mobile platforms. - Overlay Controls
A HUD controller providing extra control for both Desktop and VR users.
- Pickupable Screen
A portable screen that can be moved and resized. It is set to Local by default (other users won't see your personal screen). - Screen
A standard screen object that can be placed independently from the controls.
- Resync Button
A standalone button to force synchronization. Highly recommended for live events. - Stream Key Assigner
Automatically generates stream keys for services like TopazChat. Useful for music events.Note
See Stream Key Assigner for more details.
- Audio Source (Mono)
Add a mono audio source for VizVid. - Audio Source (Stereo)
Add a stereo audio source set for VizVid. - Audio Source (5.1 Surround)
Add a 5.1 sorround audio source set for VizVid.
(See 5.1 Surround Configuration for setup details).
- Auto Play on Near (Local Only)
Triggers a default video when a user approaches and stops it when they leave. Ideal for exhibition booths.
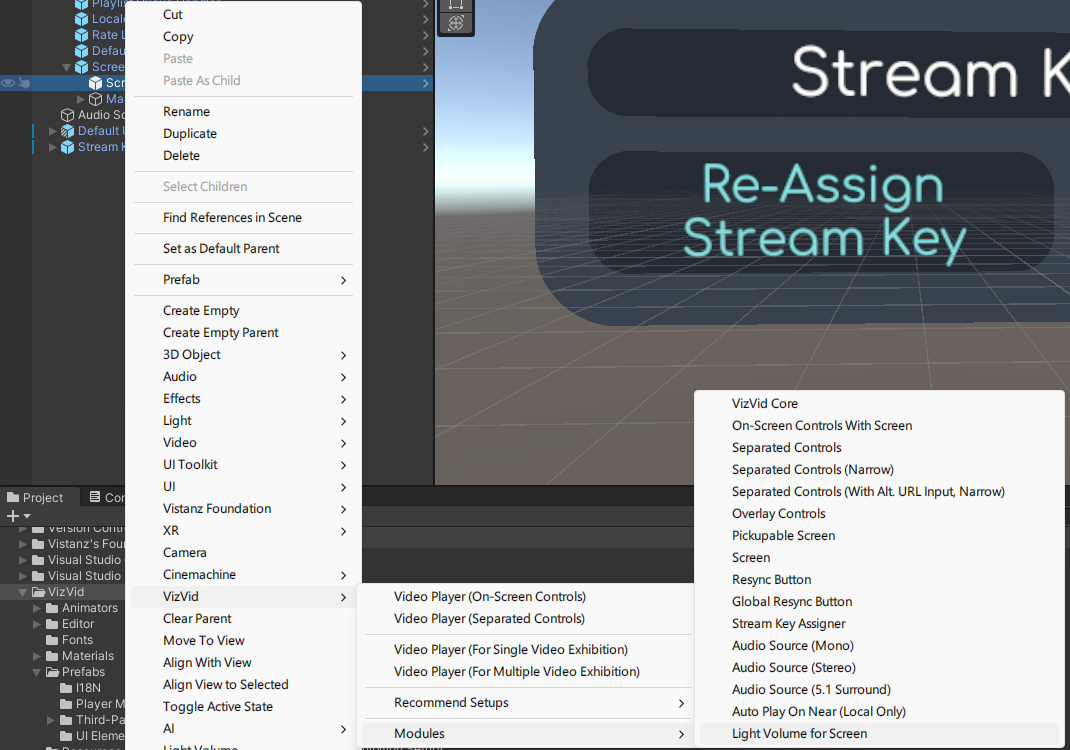
- Light Volume for Screen
Enables VRC Light Volumes (VRCLV) support for screen on VizVid.Note
This option only appears when an object containing a screen is selected.
- Active Region
Executing functions when a player enters the specified region on this prefab.
For detailed information, please refer Active Region section.
Components
Core
This component manages VizVid's playback logic.
Note
If any modules are missing, some options will not be displayed or swapped.
Audio Settings
- Default Volume
The default volume level for players when they join the world. - Default Muted
VizVid's volume are muted by default when players join the world. - Volume Fade Duration
Sets the volume fade duration when muting / unmuting or entering / leaving an Active Region. Set to0to disable. - Out-of-Range Volume
Set the target volume level when leaving an Active Region.
Repeat & Shuffle Settings
- Default Repeat Mode
Choose from: None, Repeat One, Repeat All. - Default Shuffle
Shuffle is enable by default when players join the world. - Seed Random Before Shuffle
Regenerate random seed for shuffle playback when VizVid plays a playlist.
General Settings
- Edit Playlists...
Opens the playlist editor window. You can create, edit, and import playlists.
For detailed usage, ckeck on Editing Playlists. - Enable Queue List
When enabled, URLs you input can be queued into the queue list. - History Size
Set how many playback URLs are stored in history. Set0to disable it.
Note: Contents played from playlists will not be recorded in history.
Default Behavior
- Default Playlist
Choose a playlist to use as the default from your saved playlists. - Auto Play on Join
Auto play the default playlist when the first player joined the world.- Auto Play Delay
If there are no other video players besides VizVid in the world, you don't need adjust this.
- Auto Play Delay
- Idle Behavior
Executes the specified action when the playlist finishes playing:- Stop Playing
Takes no action. - Play Default Playlist
Switches back to the default playlist and starts from the top. - Resume Last Playing Item
Switches back to the last playing item on the playlist.
- Stop Playing
- Low-latency mode
Enable low latency on AVPro for less latency on stream playbacks.
Theme Settings
- Collor Palette
Adjust color tones based on your current color settings. - Color #
Set colors on VizVid individually. - Auto Apply on Build Toggle for auto apply current color settings into VizVid's UI.
- Apply Apply color settings to VizVid's UI.
Display Settings
- Standby Screen
Set a static image if no video or image appears on screen. - Broadcast Screen Texture
Enables broadcast screen textures, allowing supported shaders (e.g., Poiyomi) to display VizVid's video signals. - Realtime GI Update Interval
The update interval for Realtime Global Illumination. Set to0to disable.
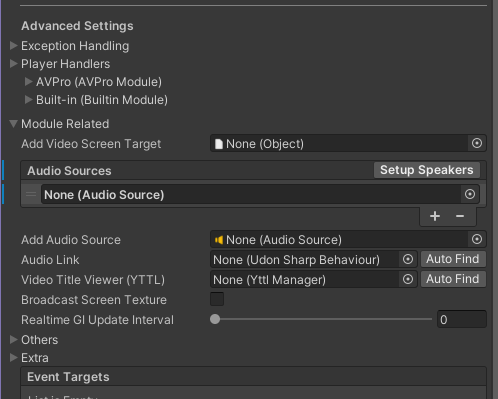
Module Related
Screen Targets
Lists screen GameObjects that contain aScreen Configuratorcomponent.- Mode
Offers three rendering modes by default:- Property Block
Applies the texture to the object via MaterialPropertyBlock without altering material assets. This is the most performance-efficient option. - Shared Material
Outputs the texture directly to the material. Any other object sharing this material will also display the video. - Cloned Material
Automatically creates a clone of the material and outputs the texture onto the duplicate.
Note
This option may not be available by some case.
- Property Block
- Material
Specifies which material slot to target if the object has multiple materials applied. - Video Texture Property Name
The shader property name for the video texture. Automatically populated based on the material's shader. - Use Scale Offset
Enable this if the material's shader lacks native AVPro support and the video appears flipped / inverted. - AVPro Flag Property Name
Set a custom shader property names for shaders that support AVPro mode. - Emission Intensity
Sets the default screen emission brightness (default:1). - Flip in Mirrors
Flips the video horizontally to keep text and visuals readable when viewed in mirrors. - Visible Mode
Controls where the screen is rendered. - Standby Screen
Overrides the global standby image with a custom image for this specific screen target. - Point Light Volume
Configures VRC Light Volumes. For details, see VRC Light Volume (VRCLV). - Fixup Aspect Ratio
Automatically fixes aspect ratio after resizing the player to prevent image distortion.
- Mode
Audio Sources
ListsAudio Sourcecomponents used for VizVid sound output.
Multiple Audio Sources can be assigned to configure multi-channel audio setups.- Mode
Selects the audio channel to receive (AVPro only).
Note
All other settings correspond to standard VRC Spatial Audio Source options.
Please refer to the VRChat Documentation for setup details.- Show Audio Source Properties
Opens the inspector properties window for this Audio Source to make adjustments.
- Mode
Player Handlers
Manages the backends connected to VizVid.
AVPro, Builtin, and Image are provided by default.
Reorder priority by dragging the = icon on the left.
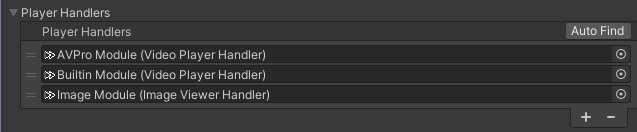
AVPro (AVPro Module)
- Max Resolution
The default requested resolution when fetching streams from multi-resolution platforms (e.g., YouTube). - Low Latency mode
Enables AVPro low-latency mode (only effective during live streams). - Primary Audio Source (Stereo Mix / Left)
Sets the primary output Audio Source. Outputs either stereo mix or the left channel depending on source settings. - Primary Audio Source (Right)
Sets the primary output Audio Source for the right channel when configured accordingly. - Use Flicker Workaround
Applies a fix for occasional screen flickering issues during AVPro playback.Note
VRChat has resolved this flicker issue in recent updates, so this option is disabled by default.
- Fallback Player Handler
The backup player backend to try if media playback fails under AVPro (default:Builtin Module).
- Max Resolution
Builtin (Builtin Module)
- Max Resolution
The default requested resolution when fetching streams from multi-resolution platforms (e.g., YouTube). - Primary Audio Source (Stereo Mix / Left)
Sets the primary output Audio Source (outputs stereo or left channel based on source settings).Note
Since the Unity Built-in backend does not support multiple audio sources, setting the output source to stereo is recommended.
- Fallback Player Handler
The backup player backend to try if playback fails under the Builtin player (default:AVPro Module).
- Max Resolution
Image (Image Module)
- Video Player Backend Name
The identifier name for the Image backend handler. - Fallback Player Handler
The backup player backend to try if an image fails to load (empty by default).
Note
Modifying settings in this section is not recommended.
- Video Player Backend Name
AudioLink
Specifies theAudioLinkcomponent.
If you already had AudioLink in the project, you can click Auto Find to specify.Video Title Viewer (YTTL)
Specifies theYTTL Managercomponent.
Exception Handling
- Total Retry Count
The maximum number of retry attempts when loading fails. - Fallback Retry Count
Playback backend will auto-switch if the threshold is exceeded. - Retry Delay
The interval time between retries when loading fails. - Time Drift Detect Threshold
Detects playback latency between all users.
Playback progress will be auto-adjust if the threshold is exceeded.
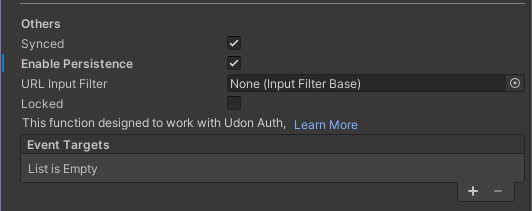
Others
- Synced
Sets whether VizVid operates globally. Enabled by default. - Enable Persistence
Sets whether to save VizVid settings (such as volume). Enabled by default. - URL Input Filter
URL filtering settings.
Implementation can be based on inheritance by referring to this Udon Script. - Locked
Locks the player by default. You can configure this by writing a compatible script or purchasing Udon Auth. - Event Targets
Sends event data to Udon Sharp scripts set here to integrate custom scripts.
Frontend Handler
This component manages playlists and VizVid's default behavior.
Note
The options for this component are integrated into the Core component.
Please refer to the Core section.
UI Handler
Manages UI integrations and component references for the player.
- Primary References
- Player Core
Links to theCorecomponent.
If unassigned, click Auto Search to automatically find and link theCorecomponent in the scene. - Playlist Queue Handler
Links to thePlaylist Queue Handlercomponent.
If unassigned, click Auto Search to automatically find and link thePlaylist Queue Handlercomponent in the scene.
- Player Core
Note
The remaining options vary depending on the UI type. Adjust these settings as needed, or connect your own custom UI components.
Screen Configurator
This component is made for linking the video screen output to a specified shader.
- Screen Renderer
Specifies the Mesh Renderer where the video content will be output.
Note
Part of the options for this component are integrated into the Core component.
Please refer to the Core section.
Color Config
This component manages UI color and usually appears alongside the UI Handler.
- Collor Palette
Adjust color tones based on your current color settings. - Color #
Set colors on VizVid individually. - Auto Apply on Build Toggle for auto apply current color settings into VizVid's UI.
- Apply
Allows you to apply colors to only the currentColor Configcomponent, or to allColor Configcomponents in the scene.
Active Region
This component manages VizVid proximity logic, executing functions when a player enters the specified region.
- Core
Specifies the linked VizVid core.
If it displays "None (Core)", you can click Auto Find to specify the VizVid core in the scene. - Bounds
Specifies the region for this component. - Static Region
Lock the position of this region. - Affected by Active State
If unchecked, the Active Region remains effective even when its GameObject is disabled. - Use World Space Bounds
Ignores the Active Region's Transform and evaluates only its bounding box, slightly reducing overhead.
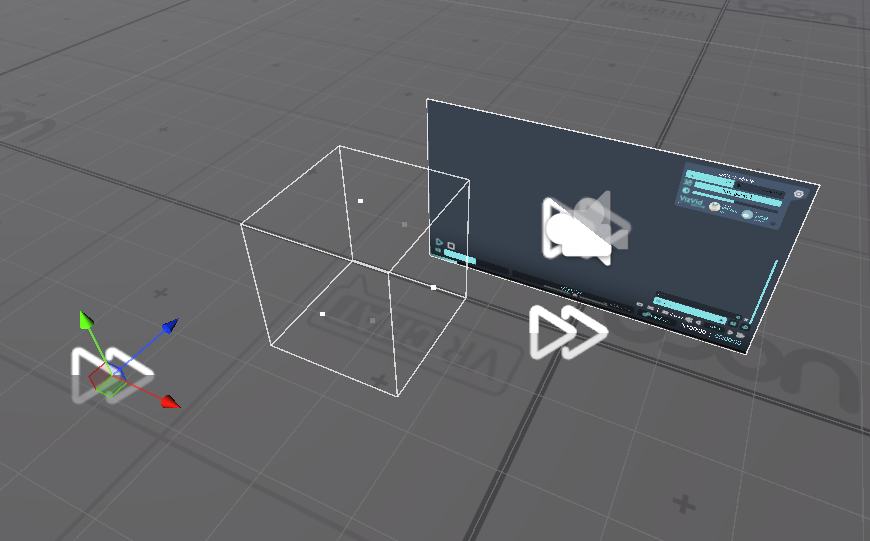
Audio Source Configurator
Manages positioning and falloff distance settings for 2.0 / 5.1 audio source setups.
- Audio Sources
Specifies the audio sources to configure. - Near Bounds
Inside this range, all audio sources output at their full original volume. - Far Bounds
Outside this range, the audio sources become completely inaudible. - Estimate
Calculates optimal falloff settings based on the current sound stage layout. - Fit
Applies the settings to the audio sources.
Other Scenarios
Import Playlist from Other Video Players
Just drag video player's object, drop in VizVid's playlist editor.
Supported video players in the following:
- VizVid
- USharp Video
- Yama Player
- KineL Video Player
- iwaSync 3
- JT Playlist
- ProTV by ArchiTech
- VideoTXL
Lighting & Visuals
LTCGI
- Refer to the LTCGI Documentation and place the LTCGI Controller into your scene.
- In the LTCGI Inspector, an "Auto-Configure XXX" button will automatically appear.
- Confirm that "XXX" is your VizVid Core, then click the button to allow LTCGI to receive the video signal from VizVid.
Note
LTCGI requires the use of supported shaders to display effects correctly.
Refer to this documentation to select a suitable shader.
VRC Light Volume (VRCLV)
- In the Hierarchy, right-click the VizVid screen object
- Follow the settings shown in the attached image to enable VRC Light Volume for VizVid:
Note
Please note that VRC Light Volume requires the use of supported shaders to display effects correctly.
Refer to this documentation to select a suitable shader.
Audio/Video Streaming
Many performance-based events uses external RTMP/RTSP services for low-latency stream into VRChat.
VizVid provides 3 methods in the following of stream URLs for performers and users.
Let's use TopazChat as an example.
Stream Key Assigner
Automatically generates and applies stream keys for streaming services.

- Core Handler
Responsible for connecting to theCorecomponent.
If the reference is missing, you can click Auto Find to link it to theCorecomponent in the scene. - Playlist Queue Handler
Responsible for connecting to thePlaylist Queue Handlercomponent.
If the reference is missing, you can click Auto Find to link it to thePlaylist Queue Handlercomponent in the scene. - Player Backend Type
Select the designated player backend. Streaming events typically useAvProPlayer. - Stream Key Template
The format of the stream key. This can be modified as needed. - Stream URL Template
The primary stream URL. Defaults to the TopazChat service and can be changed as needed. - Alt. Stream URL Template
Alternative link for mobile platforms.
Defaults to the TopazChat service; please use the same server as the URL above.
Note
{0} represents the unique ID for stream key; please ensure it is kept in the template.
- Key Count
The number of keys to be generated. - Unique ID Length
The number of characters for the generated keys.
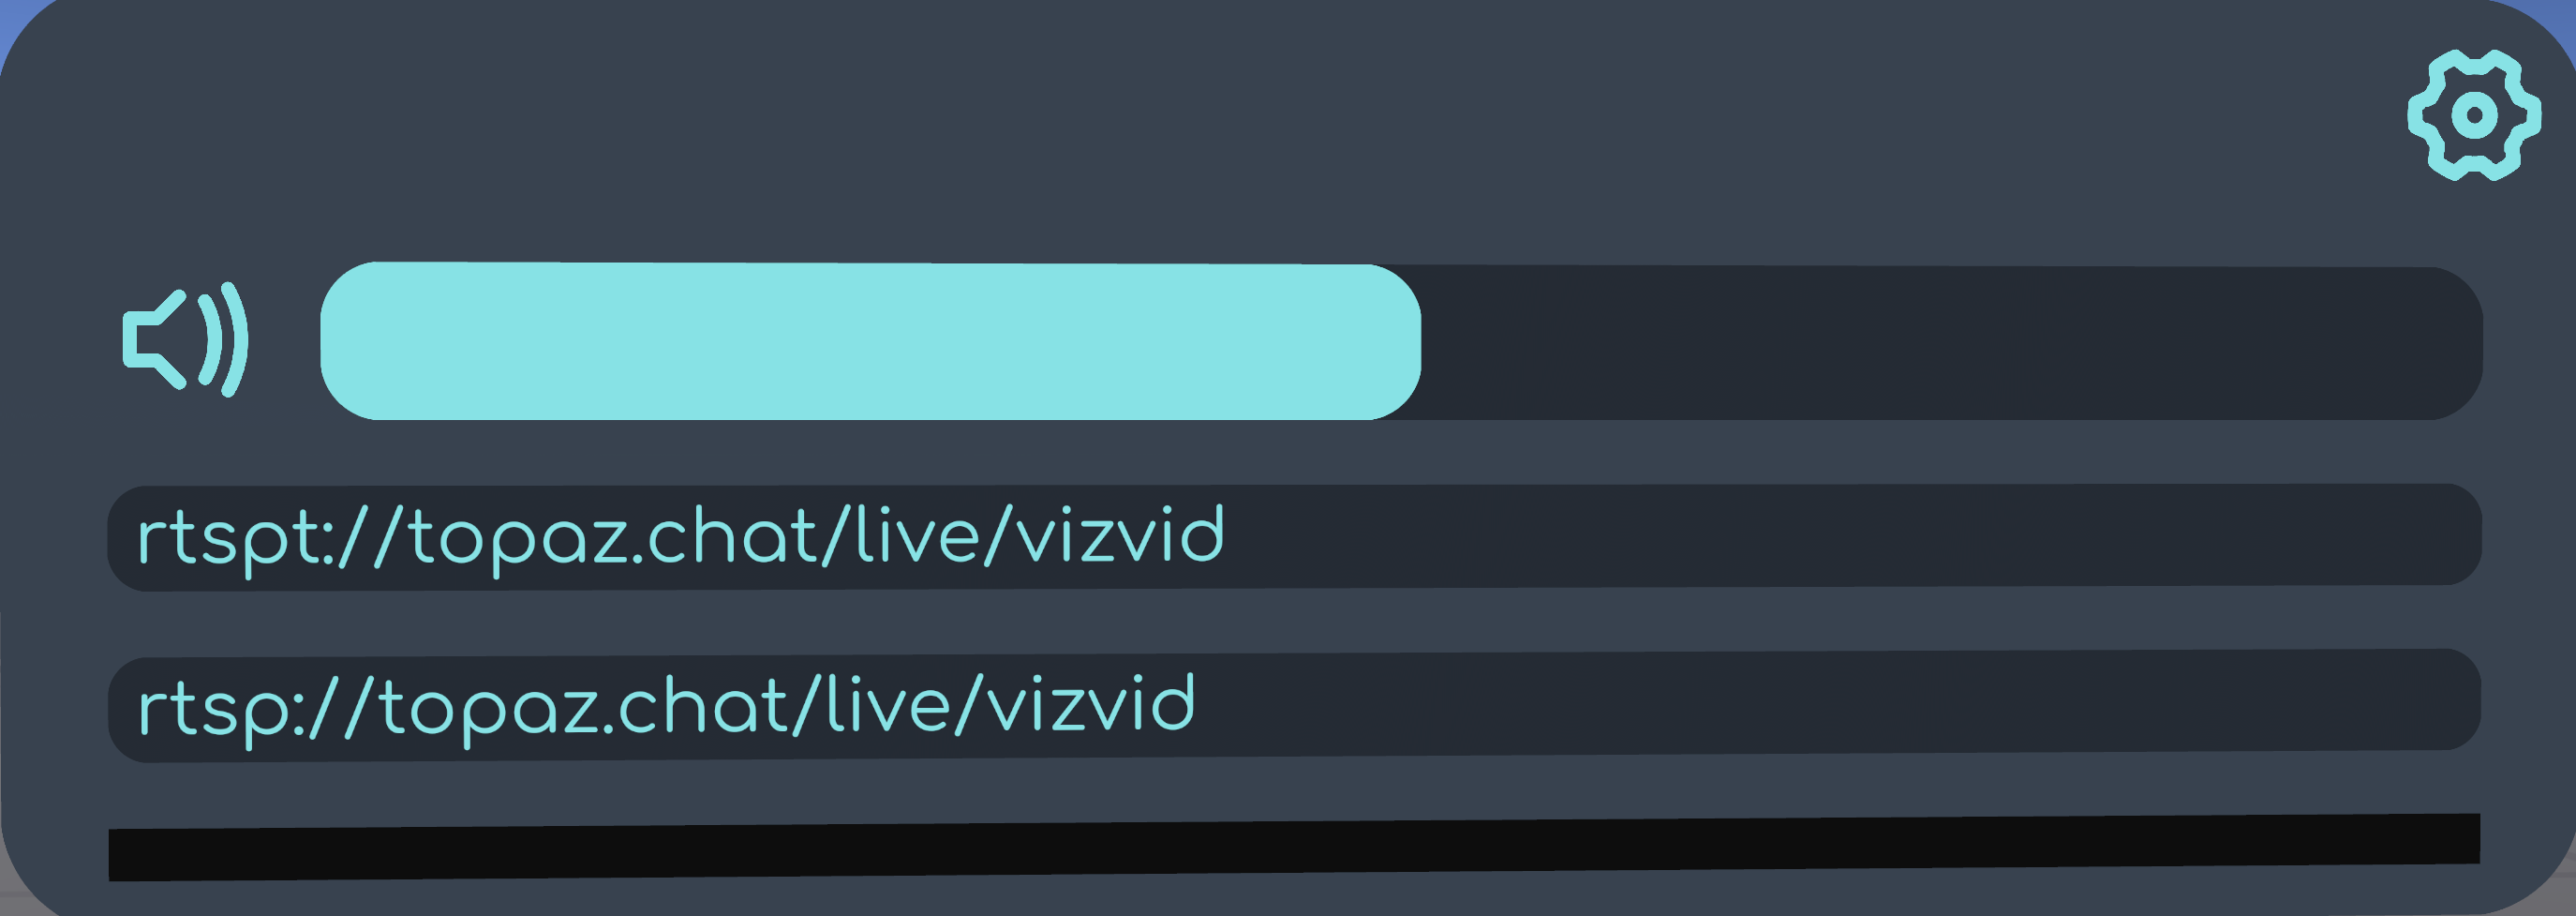
Separated Controls (with Alt. URL Input, Narrow)
Allows manual input of the stream URL and an alternative mobile platform URL directly within VRChat.
Reference image below:
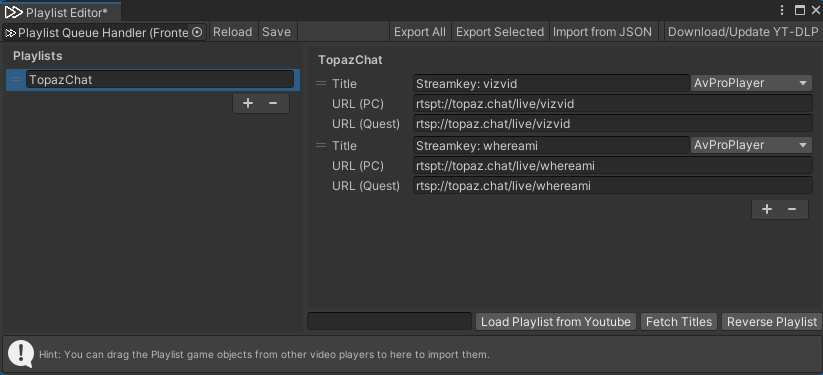
Playlist Editing
Stream using a fixed stream key via the playlist.
Configuration reference image below:
Audio
BGM Volume Control
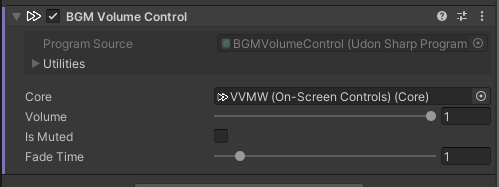
If your world has background music or ambient sounds, you can add this component to allow VizVid to automatically mute these Audio Sources when media content is playing. They will be unmuted when playback stops.
- Select the Audio Source you want to auto-mute.
- In the Inspector, add the
BGM Volume Controlcomponent. - Specify the core to be used.
- Done!
Stereo Audio Setup
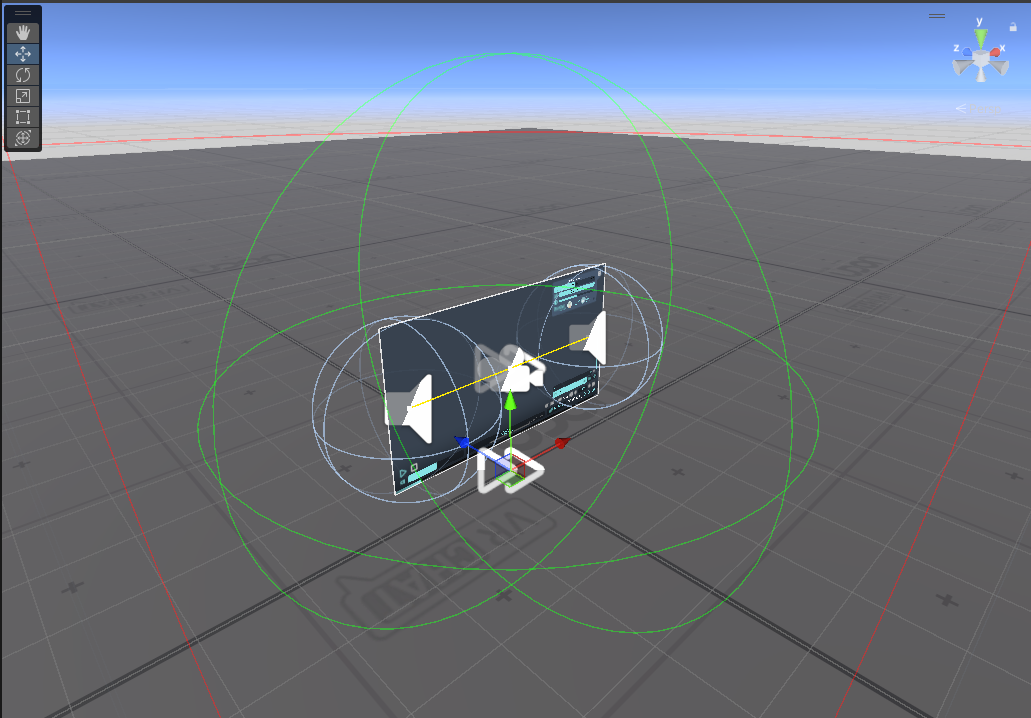
To meet the needs of world creators, VizVid can be configured to output directional stereo audio.
Follow these steps to configure it:
- Add
Audio Source (Stereo)via theModulemenu; it will automatically bind to VizVid. - Adjust the yellow bounds shown in the image to position the audio sources according to your scene layout.
- Click Estimate to recalculate falloff settings.
For detailed settings, see Audio Source Configurator. - Click Fit to apply the settings to the audio sources.
- Done!
5.1 Surround Setup
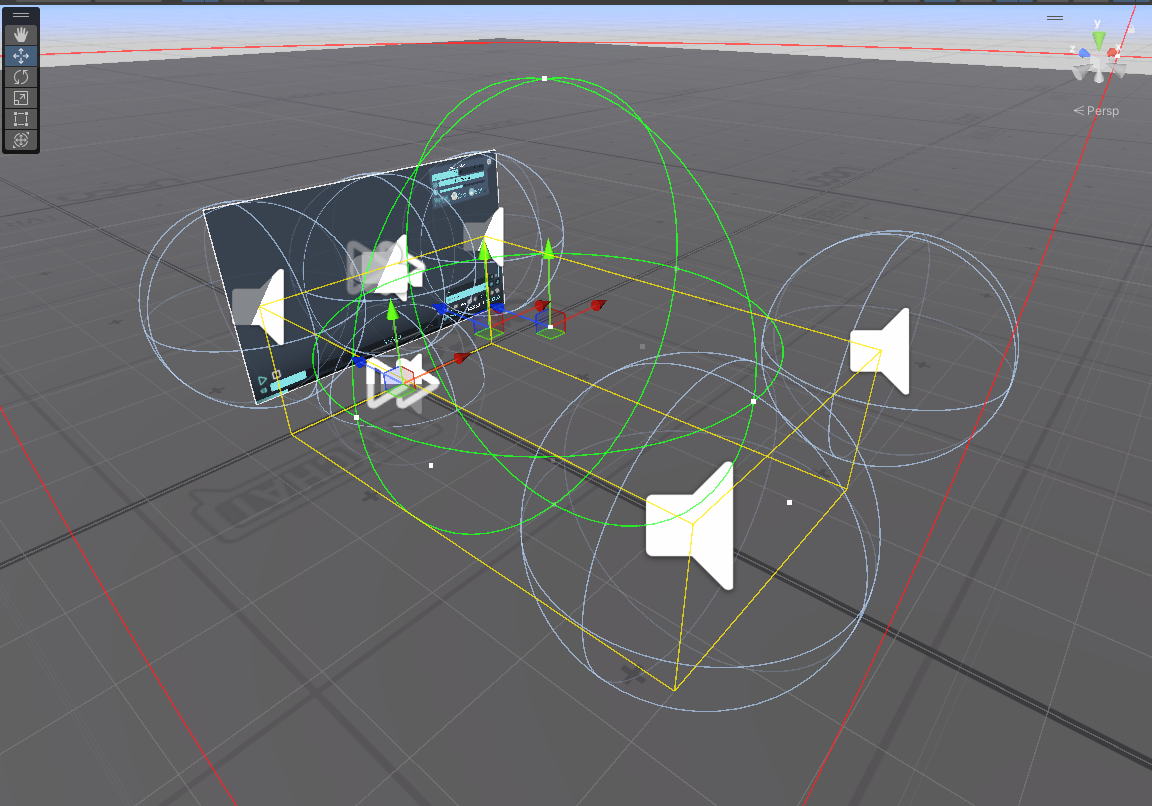
VRChat's AVPro backend supports 5.1 surround sound output within VRChat.
This is commonly used in cinema scenes or similar environments.
- Add
Audio Source (5.1 Surround)via theModulemenu; it will automatically bind to VizVid. - Adjust the yellow bounding lines shown in the image to position the audio sources according to your scene layout.
- Click Estimate to recalculate falloff settings.
For detailed settings, see Audio Source Configurator. - Click Fit to apply the settings to the audio sources.
- Done!
Note
Due to technical limitations, the Builtin backend does not support multiple Audio Sources, which may cause audio to output only from the left channel.
Please adjust your configuration accordingly if using the Builtin backend.
UI Display
Reversing Playlist Order
If you prefer to use VizVid’s old version reverse-order playlist, you can change it using the following method:
- Locate the
Play List Entriesobject in your scene.Note
The location of this object is slightly different between On-Screen Controls and Separated Controls.
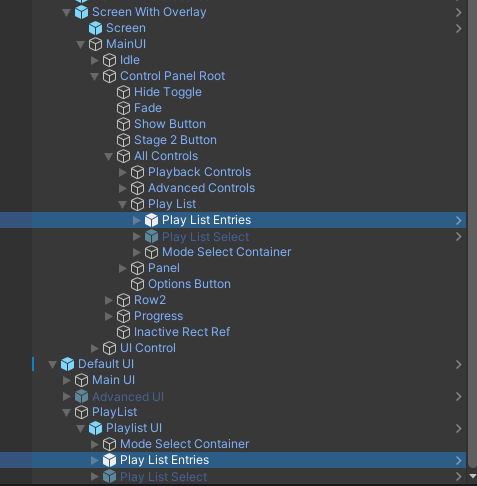
- In the inspector, find the
Pooled Scroll Viewcomponent. - Uncheck the
Inverse Ordercheckbox.
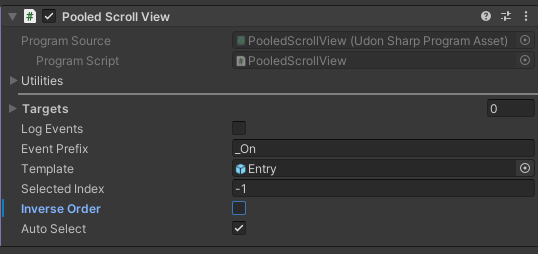
- Extend
Play List Entriesobject, follow the image, selectNext On HolderorNext Onobject.
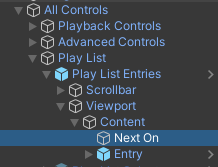
- In the inspector, adjust
Rect Transformby the following image.- Default UI
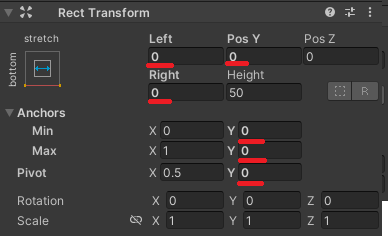
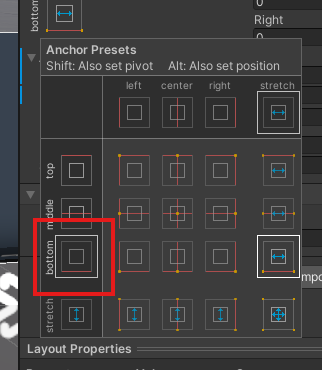
- Screen With Overlay
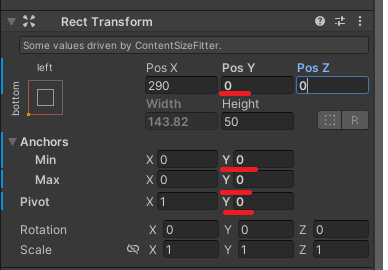
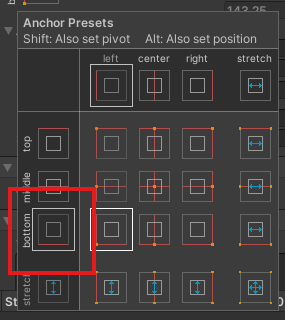
- Default UI
- Done!
Controlling Multiple VizVids with Overlay Control
Applicable when there are multiple VizVid in a world.
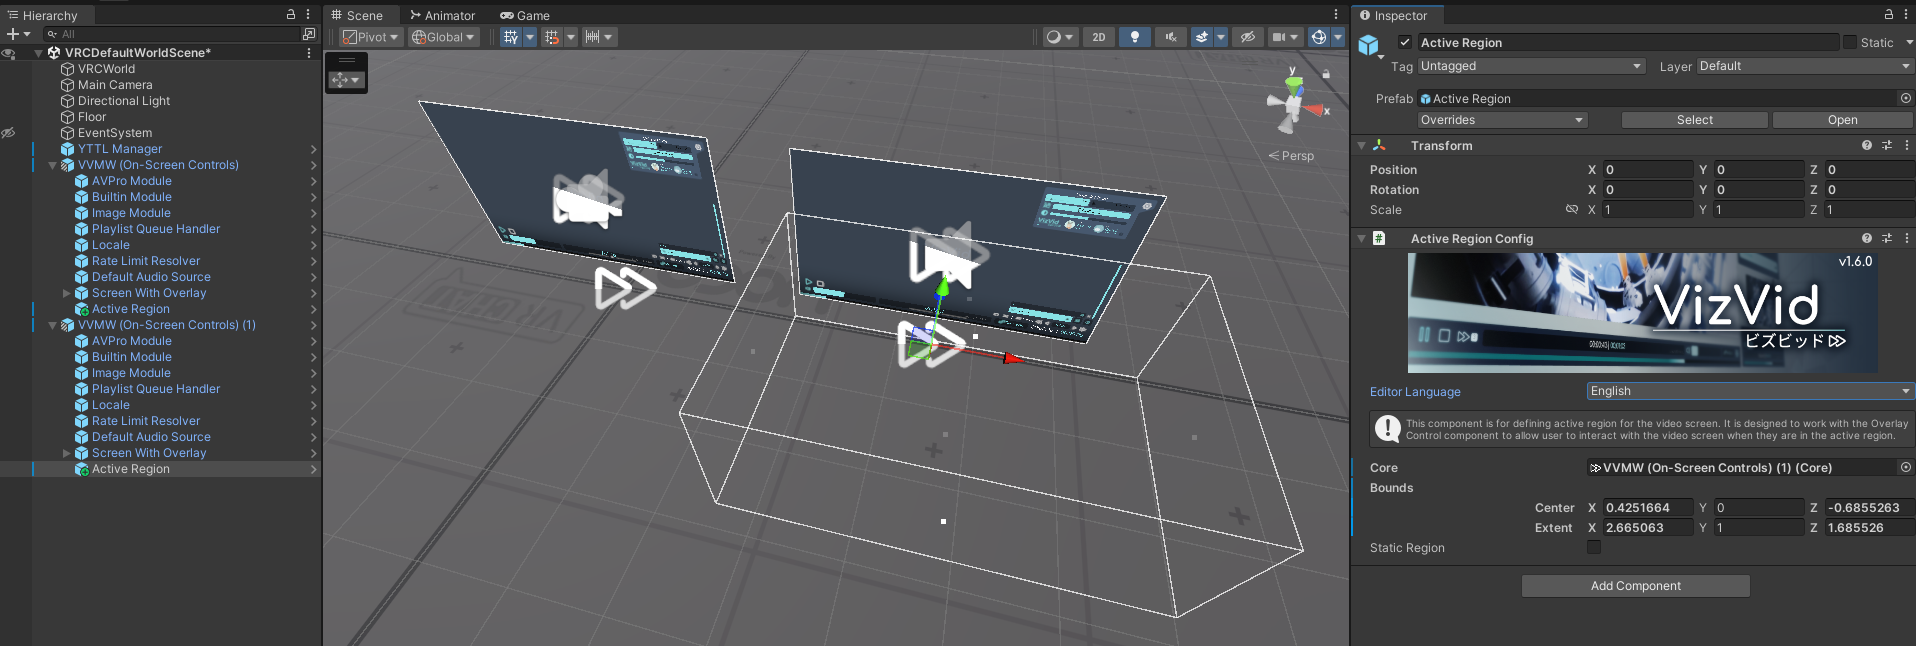
By adjusting the bounds with Active Region, the Overlay Control will switch its target whenever a player enters that specific range.
- Select the object containing the VizVid Core where you want to add an Active Region.
- Right-click on it, and select
VizVid > Modules > Active Region. - Select the newly added
Active Regionobject and define the coverage area by adjusting its boundaries.
- Done!
Locale
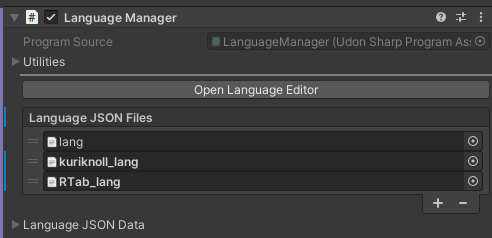
Language Manager is located under the Locale object to manage locales.
It also supports Text Mesh Pro UI elements outside of VizVid.
- In the Language Manager, refer to the JSON format to add a custom JSON file, edit the Language Keys, and enter the corresponding translations.
- Add the
Language Receivercomponent to the Text Mesh Pro UI object you want to translate. - Enter the corresponding Language Key.
- Done.
Tip
Language Manager can operate without VizVid. You can remove related objects (including the Core) if you don't need VizVid.
Keep the language menu, you can still switching between languages.
Note
Language Manager supports importing multiple JSON files. If you are concerned about overwriting VizVid's built-in JSON lists, you can create a separate JSON and import it into this component.
API Reference
Please refer to this page to link custom functions to VizVid.
Q&A
(Continuously Updated)
Q1: I configured LTCGI according to the instructions, but it didn't work.
A1: Your screen shader is likely not provided by VizVid. Please manually add an LTCGI Screen component.
Q2: I changed the default volume for VizVid, but it doesn't seem to reflect in VRChat?
A2: VRChat will use user's data first if they visited the world when Enable Persistence is checked in the VizVid Core.
To reset this and apply new default values, users must reset their data for that world in VRChat.
Q3: I can't find Core option in some components.
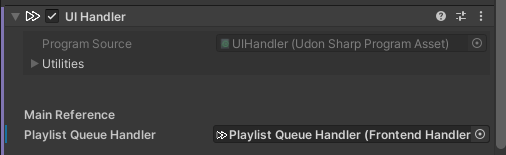
A3: Remove the Playlist Queue Handler object for once from the reference field, and the Core option will appear.
Due to the limitations of Unity's inspector editor, if the component has already found the Playlist Queue Handler, the Core option will be hidden by default.
Q4: No video, sound during playback
A4: Make sure your screen, audio source objects are specified in your Core component.
Q5: It's feels buggy when fetching YouTube related contents. (Title, Playlist, etc.)
A5: Maybe you've got an outdated YT-DLP. Click on Download/Update YT-DLP might fix it.
Q6: I want to test VizVid in my Unity editor but it won't work.
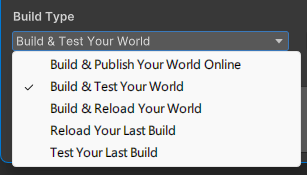
A6: VizVid requires backends in VRChat to function. If you want to test it without uploading, please create a local test build via the VRChat SDK.
Note
If this section didn't solve your problem.
Just join our Discord server look for help.